Friday 21 June 2013

Blogger Tips Verify Site in Webmaster Tools Using Google Tag Manager

Perform below steps to make use of Google Tag Manager for site verification.


  1. Go to Google Tag Manager and sign up for a account.

  2. Now you have to create a container. To do this fill a very simple form by entering your container name (enter your blog name or anything else of your choice), time zone, domain URL etc.


Blogger Tips Verify Site in Webmaster Tools Using Google Tag Manager
  1. Now paste your container code into your blog template under </head> tag and save the template.


Blogger Tips Verify Site in Webmaster Tools Using Google Tag Manager
  1. Now come back to your Google Tag Manager Account page and follow the last step of filling some tags in container. You can skip this step. Click on I'll add tags later.
Blogger Tips Verify Site in Webmaster Tools Using Google Tag Manager

  1. Make sure that you have all the permissions like View, Delete and Manage to verify your site easily.
Blogger Tips Verify Site in Webmaster Tools Using Google Tag Manager

  1. Now Log in to your Google Webmaster Tools Account.

  2. Now choose that site which you want to verify and click on Manage site button and select verify this site.

    If you have not added any site yet, then click on Add a site button at the top right corner to add new site.
Blogger Tips Verify Site in Webmaster Tools Using Google Tag Manager

  1. Now you'll redirect to verification page. Select Google Tag Manager from the verification methods.
Blogger Tips Verify Site in Webmaster Tools Using Google Tag Manager


  1. Click on verify button.

  2. You are done!

How Submit Blogger Sitemap To Bing and Yahoo Search Engines Blogger Tips

How to submit blog sitemap in Bing. They told me that their blog posts are not getting index in Bing and Yahoo. That's why today I bring this tutorial for all of you so that you can learn a best way to get all of your blog posts indexed in these search engines. Being indexed in all search engines increase our organic traffic that is must for success of our blog. Before I told you how to get blog posts indexed, let's first learn how to submit blog sitemap in Bing.

How To Submit Blog Sitemap To Bing and Yahoo?

There is no need to submit the blog sitemap in Yahoo. Submitting blog in BING will do the full job. Now let's start the tutorial.

  1. Go to Bing Webmaster Tools and log in with your Hotmail Account.

  2. Add your blog URL and click on Add button at the top of the page.
3 . Now copy the below code and paste into Add a Sitemap field on next page.


    http://www.makemoneyfreewithus.blogspot.com/atom.xml?redirect=false&start-index=1&max-results=500


  1. Click on Add Button.

  2. Now you need to verify your blog ownership by adding Meta tag in your blog template.

verify ownership

  1. Copy the meta tag and perform below steps:

    • Go to Blogger > Template
    • Find <head> and paste meta tag just below it
    • Save the template
    • You are done!
  2. Now go back to your Bing Webmaster Tools page and click on Verify button.

  3. If you have more than 500 published posts in your blog, then you must need to add more sitemaps. Go to your site dashboard in Bing Webmaster Tools and submit below sitemaps there.

  4. For Posts between 501 - 1000

    http://www.makemoneyfreewithus.blogspot.com/atom.xml?redirect=false&start-index=1&max-results=500

    For Posts between 1001 - 1500

    http://www.makemoneyfreewithus.blogspot.com/atom.xml?redirect=false&start-index=1001&max-results=500
Now you have successfully added your blog sitemap. It can take few days, usually 3 days, to get index your blog posts.

Now your blog is ready to gain organic traffic from Bing and Yahoo. Congrats :)
  • Check: Verify Site in Webmaster Tools Using Google Tag Manager
Now let see what we have to do to improve our blog's indexing rate in Bing and Yahoo.

How to increase Indexing in Bing and Yahoo Search Engines?

It usually happens that after submitting sitemap, our blog posts not get index on time in these two search engines. In that case we need to ping the Bing and Yahoo to notify them about our newly added content so that our posts get indexed as soon as possible. Let see how to do it.

Perform below steps:

  1. From the below Links, replace http://www.makemoneyfreewithus.blogspot.com with your blog URL.

  2. Now copy below links one by one and paste into your browser address bar and pres enter.

  3. You'll get a message "Thanks for submitting your sitemap" that means you have successfully pinged Bing. Cheers!


  4. LINK#1 For Posts between 1-500

    http://www.bing.com/webmaster/ping.aspx?siteMap=http%3A%2F%2Fwww.makemoneyfreewithus.blogspot.com%2Fatom.xml%3Fredirect%3Dfalse%26start-index%3D1%26max-results%3D500

    LINK#2 For Posts between 5001-1000

    http://www.bing.com/webmaster/ping.aspx?siteMap=http%3A%2F%2Fwww.makemoneyfreewithus.blogspot.com%2Fatom.xml%3Fredirect%3Dfalse%26start-index%3D501%26max-results%3D500


    LINK#3 For Posts between 1001-1500

    http://www.bing.com/webmaster/ping.aspx?siteMap=http%3A%2F%2Fwww.makemoneyfreewithus.blogspot.com%2Fatom.xml%3Fredirect%3Dfalse%26start-index%3D1001%26max-results%3D500

This is enough to start indexing of your blog posts in both the search engines. But I have noticed that our blog posts not get indexed on time and even not indexed many times.

That's the reason why bloggers fail to gain traffic from Bing and Yahoo search engines. To overcome this problem, we have a great feature in our Webmaster Tools account. When we publish a new post in our blog, we can submit the URL of that post to in our account. Adding link manually gives us 100% result of indexing the posts on time. Let see how to submit the links.

How To Submit Links in Bing Webmaster Tools?


Perform below steps:

  1. Go to My sites page in your Bing Webmaster Tools account.

  2. Choose your site.

  3. Click on Configure My Site and choose Submit URLs.

  4. Now add your blog post URL in the Submit URLs box and press Submit button.

  5. Note: We can only submit 10 links in a single day and 50 links in a month.

  6. That's it!

Summary

  • Submit your blog sitemap to Google, Bing and Yahoo search engines to gain organic traffic to your blog.
  • Track your number of indexed posts, traffic sources and linked sites from webmaster tools.
  • Ping Bing and Yahoo to improve indexing rate.
  • Submit links manually for assured results.

Saturday 15 June 2013

Made Automatically Share Blog Updates on Google Plus

Social Media promotion is every blogger's need. If a blog is an engine, then social media acts like a lubricant, without which a blog would stall. This is why bloggers need to share their awesome content so that people around the world can know about it. To that effect, Google is trying to help out bloggers by ruffling quite some feathers. Recently, Google released the Google Takeout service that lets you merge two Google Plus accounts together. Now, you can connect your Google Plus account with Blogger to easily share your posts and also gain recognition for your work on social media. A share box will automatically appear when you publish a post, with which you can instantly share your content with the world! We'll look at how we can do this in this post.

Please note: This service is for Blogger blog only. It isn't available for WordPress or Type Pad or any other publishing platform blogs. Also, Google makes it pretty clear that this feature is not available for you if you have adult content on your blog. This is Google's way to keep its social channel clean, which is a good thing.

Connecting Blogger With Google Plus

This trick will work only if you have your Google+ and Blogger profiles under the same Google Account with a common name. If both your profiles are under one account, then you are in luck. Simply log in to your blogger account, and go to your blog dashboard.In the top-right region of your screen, you will see a cog icon.
connect to Google+
You will see an option to Connect to Google+. Click on that, You are ready to make the switch. Just check the "I've read...." box and click switch.

If in the future, you want to disconnect the two accounts and revert to your Blogger profile, you can simply use the cog icon again, and they'll be an option to disconnect the two accounts.

Sharing posts

Once your posts are linked, you will see an option to share your posts right from your Blogger dashboard. This will also let you share your posts whenever you want, without having to deal with auto pop-ups.
share-link-in-posts
Besides this, whenever you publish a post, you will see a pop-up box appear that has sharing options. It is pre-filled for your ease, and you can add a comment as you like. You can also choose which circles you want to share the post with. By default, the option will be set to Public.
If you don't like this sharing box, and if it's annoying you, you can simply disable it by going into Settings >> Posts and Comments.
googleplus settings for blogger
That's about it. You can take advantage from this feature to easily share your content without having to manually go to your published pages and then using the available sharing widgets.

Tuesday 11 June 2013

5 Social Media Management Tools Blogger Tips and Tricks

5 Social Media Management Tools Blogger Tips and Tricks

What happen a blogger ? Managing all of your social media accounts are some things which might be pretty time overwhelming – if you’re not doing it properly. change regular posts one thing that takes time to regulate to and work on - however something that your diary or business will extremely have the benefit of greatly. investment some time and energy in social media one thing entirely worthy – and something abundant easier once you’re mistreatment the proper tools and instrumentation to assist you out.

Read Automatic Share Blog Posts on Facebook, Twitter and Google Plus Super Tips and Tricks

Don’t feel afraid or intimidated concerning mistreatment on-line tools to assist manage your social media it will help prevent time and it also can mean you efforts are being recorded properly too. After all, time and energy saved in one a part of your promoting efforts – is time and energy you'll use in other places.

So here are five nice tools you'll simply check in to on-line – they're simply to navigate too, therefore you don’t got to worry concerning being inundated by new technology. allow us to grasp what you think that of those tools, and be at liberty to comment below is there are any you’d prefer to add.

1 Shortstack  
This is often an excellent service that aids businesses to style and build a far better trying Facebook page and customise it with numerous things like videos and contests. The service is especially free (they won’t charge for pages that have up to a pair of,000 likes). on the far side that, a layer system kicks in, however it’s terribly affordable.

2 Buffer app  
Could be a sensible thanks to schedule your social media activity and tweets. the web site and tools permits you to distribute you’re statuses and tweets throughout the day (at times you'll select and coordinate). the essential package is free – however if you wish to feature additional accounts or schedule tweets for extended periods of your time, you’ll got to upgrade. The tool is nice because it permits you to make sure that contemporary social content is going to your audience daily.

3 Postling  
Was meant for little business users in mind and delivers easy-to-use tools, alerts and understandings which will assist you get the foremost out of social media promoting and allow you to create the foremost out of your business. Postling permits you to publish to any or all of the key social media sites, as well as Facebook, Twitter, LinkedIn, WordPress, Tumblr and Flickr and schedule your posts before. It additionally pulls comments from all of your social media sites into one place that saves plenty of your time and energy for responding.

4TweetDeck  
This tool is currently closely-held by twitter and could be a fantastic thanks to manage multiple twitter accounts. It takes the shape of a “dashboard” from that you'll manage a range of social media accounts all at once in one place. It permits you to observe and manage unlimited accounts, schedule tweets to fit your audience and filter content to specialize in what matters to you the foremost – it’s the sort of issue you’ll surprise however you ever lived while not.

5 HootSuite 
This web site and gear is incredibly like TweetDeck and permits you to manage all of your social media accounts on one dashboard. this is often an honest resolution if quite one person at your business posts to your social media accounts.

I hope like you this article dear readers you can read more articles about social media

Sunday 9 June 2013

Create More Than 20 Static Pages in Blogger Tips and Tricks

Create More Static Pages
Hi guys today I am going to share a very interesting trick with all of you guys by which you will be able to create more than 20 static pages in blogger. Yes you heard it right. Now you can create more than twenty static pages easily with a little trick which I like to name as Blogger Pages Hack. As you may already know that blogger have some very interesting features like Custom Robots Header Tags for better search preferences, Custom robots.txt file option and many more. But there is also a limitation that is we can only create 20 static pages per blog. But don't worry. Today I bring a trick by which everyone can create more than 20 pages in their blogspot blog. I am sure that you guys are really excited to know about this trick. Before starting the tutorial please see a live demo first.
Creating More Than 20 Static Pages in Blogger By default, if you try to create 21th page then a message will appear on your screen like this:


To create additional pages perform below steps. But please perform each step carefully on your own risk. I preferred you to use this trick first on any test blog.
  1. First create 20 pages than go to second step.

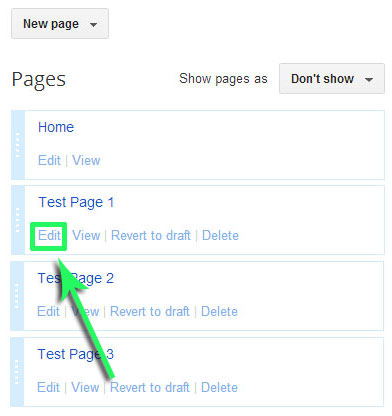
  2. Once you create 20 pages, click on "Edit" button of the first page. See below screenshot.


  3. blogger static pages

  4. Now copy the URL of that page from the address bar as shown in below image.

  5. page url

  6. Paste that URL in any text editor like notepad. Please keep it saved. If you lost this URL then you won't be able to retrieve this page again.

  7. Now we have to delete this page. Don't worry we will get it back again. To delete this page go back to edit pages and delete this page. Now you have 19 static pages left in your blog which means you can create one more new page (page number 21) because you have deleted a old page (page number 01).

  8. Create new page which will be your page number 21.

  9. Now you have 20 static pages again in your blog counting from 2 to 21. Now we have to retrieve our page number 1 which we deleted first. So to get back that page simply open a new tab in your browser and paste the URL of that deleted page which you copied in step 3.

  10. You will see that the page is now appearing on your screen. Simply click on "Publish" button.

  11. Once you click the publish button your deleted page will come back and now you have 21 static pages in your blog.

  12. Perform these steps as many times as the number of additional pages you want in your blog.

  13. That's it!

Customized Stylish Popular Posts Widget With Round Thumbnail in Blogger Tips and Tricks

popular post widget
Popular posts widget in blogger is the best widget which helps to represent the whole blog in a better way to the visitors. It shows the most popular posts of a blog to the readers  so that they can also read them. This amazing gadget in blogger sidebar helps to highlight the trending posts in front of readers. Except these benefits, there is also a limitation of this widget. The only limitation is that the default popular posts gadget is not so attractive and attention grabbing because of its designing and dull looks. But don't worry, we can override its stylesheet and change its colors and fonts according to our need so that it matches best with our blog template. In today's tutorial I will tell you the way to make this gadget more prominent and stylish so that it grabs your visitor's attention. We will customize the default gadget to transform it into a masterpiece. So, let start the tutorial.

Add Popular Posts Widget To Blogger Blog


First we need to add default popular posts widget into our blog. Perform the following simple steps to add it.
  1. Go to Blogger > Layout.

  2. Click on Add a gadget link and choose popular posts gadget from the gadgets list.

  3. Now make following settings

  • Set most viewed to Last 7 days
  • Check image thumbnail and snippet to show thumbnail along with post summary. It will make our gadget spicier.
  • Select no. of posts you want to show. In this example I am selecting 5. You can show at most 10 posts.
  1. Save the widget.
  2. Now go to Blogger > Template
  3. Backup your template to prevent it from any crash.
  4. Edit HTML > Proceed
  5. Search ]]></b:skin>
  6. Now replace it with the following code:

  7. /*--- BloggerTipsTricks --- */
    .popular-posts ul{padding-left:0px;}
    .popular-posts ul li {background: #FFF url(http://4.bp.blogspot.com/-oOVUW06ghgo/UHwuqL9TltI/AAAAAAAAGKU/Nj4DQnvft8k/s1600/1.gif)  no-repeat scroll 5px 10px;
      list-style-type: none;
      margin:0 0 5px 0px;
      padding:5px 5px 5px 20px !important;
      border: 1px solid #ddd;
      border-radius:10px;
      -moz-border-radius:10px;
      -webkit-border-radius:10px;
    }
    .popular-posts ul
      li:hover {
      border:1px solid #6BB5FF;
    }
    .popular-posts ul
      li a:hover {
      text-decoration:none;
    }
    .popular-posts .item-thumbnail img {
      webkit-border-radius: 100px;
      -moz-border-radius: 100px;
      border-radius: 100px;
      -webkit-box-shadow: 0 1px 3px rgba(0, 0, 0, .4);
      -moz-box-shadow: 0 1px 3px rgba(0, 0, 0, .4);
      box-shadow: 0 1px 3px rgba(0, 0, 0, .4);
    }
    ]]></b:skin>


  8. Save your template.
  9. Done!
Now visit your blog and check this fancy popular posts plugin in your blog sidebar.

Embed Youtube Videos into Blogger Post Tips and Tricks

embed youtube videos
A post without images becomes nasty and boring to read for readers. Adding an topic related image into blog post makes it interesting and nifty. An image is better than thousand of words if it is optimized properly. You should know how to optimize images before adding them into your post. It will enhance user's reading experience and also increase your blog traffic. You may already know the benefits of adding images into post but do you ever think about adding video into your blog posts? Videos add extra fun into your boring posts. It is the best way to explain such topics which are difficult to explain by only words. Users feel easy to understand it if there is a video tutorial in the blog post. If you are running any video blog then you must need to add videos into your blog post. So, today I will tell you the easiest way to embed Youtube videos into your blog post. Let's play the fun.

Embed Youtube Videos

  1. Go to www.youtube.com

  2. Search for the video you want to embed into your post.

  3. Now below that video you will find some options. Click on Share tab as shown in below screenshot.

  4. youtube video
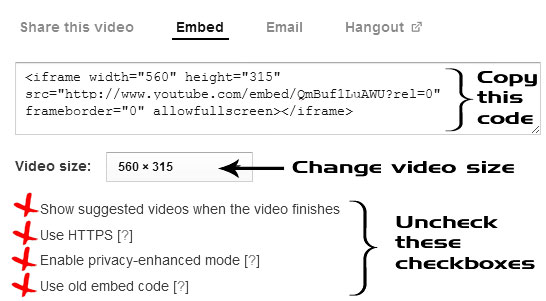
  5. Now click on Embed tab and copy the entire code.

embed video

Note:
  • You can change video frame size according to your need. You can also use custom size which you want.
  • Unchecked all 4 check boxes.
  1. Now paste that copied code into your blog post's HTML view.

  2. You are done!
Now you have successfully embedded youtube video into your blogger blog post. You can also use this code in your blog sidebar widget to add video in sidebar.

Improve Image Quality in Blogger Post Tips and Tricks

Improve Image Quality Blogger
Today I bring a trick for bloggers to improve the image quality in their blog posts. I am not talking about optimizing the images, but I am talking about the quality of the images which normally distort after uploading the pictures in blog posts. Blogger's image uploader never shows up the images in their original size we wanted it to be. And if we try to resize it, then it lost their quality. I found a solution that will help us to maintain the quality of images we upload to our blog posts. Let's learn this trick practically. But before I start the tutorial, you may be interested to check a demo of the difference you can get after applying the trick on your blog.

Before


After

Have you noticed the difference in both the images? This is what we normally face in blogger. So, it's time to learn how we can improve image quality in blogger.

Improving Image Quality in Blogger Post

The reason of poor quality is high compression ratio which is used to create the thumbnail. Once we insert a picture in our blog post, we have several options to resize it like Small, Medium, Large, X-Large and Original Size. But I like to resize it manually in HTML. Follow below steps to improve quality of your images in blogger.
  1. Upload an image in blog post.

  2. Now switch the post editor view to HTML mode.

  3. Search for the image source code something like below.
  4. <img src="http://1.bp.blogspot.com/-YswKb-hOY_A/UYz3HmuYLSI/AAAAAAAADlo/u7TLzUBAfY0/s320/image-quality.jpg" height="120" width="320" />

  5. The above source code is the URL of a thumbnail and if we try to resize it, then it will lose its quality. To gain image quality back, simply delete s320/ from the image source code. Deleting this code will force the browser to display a scaled image with high definition.

  6. If you want to display image in its original size, then simply edit its height and width.

  7. That's it.

New Tip and Trick For Bloggers To Increase Google Page Rank

Increase Blog PageRank
After the first page rank update of 2013 that was happened on 4th Feb 2013, many blogs got very impressive PR. And now the second page rank update of 2013 is in its way. It is very near. Probably it will happen in the second week on May. Actually this is only the prediction. No one is sure about that when will second page rank update happen. We all bloggers are excited and hope to gain some PR to our blog. That's why we try everything to increase PR. We try to build quality backlinks because they help us to gain link juice which increases our blog page rank. But friends, today I am going to share a special trick that will boost your blog's indexing, traffic and PR too. Let's see what's special today.

Trick to Increase Blog Page Rank

Actually page rank depends on various factors like:
  1. Incoming Links
  2. Outgoing Links
  3. Internal Links (Read: Benefits of Internal Linking in SEO)
  4. Dofollow Links (Recommended Post: How to Build Quality Dofollow Backlinks)
  5. Nofollow Links
  6. and many more...
But today I'll tell you how you can increase your blog page rank by using static pages in blogger.

Yes, you heard it right. You may already use them in your blog for some important pages like about us page, contact us page etc. But, now we can use static pages in such a manner that will help us to gain some extra link juice that will directly increase page rank of our blog and blog posts. Let's see how it can be possible.

Friends I hope you all guys are using labels on your blog to categorize your blog posts. Right! Sometime you may definitely use them as an in-content link (internal link).

But friends do you know that our labels pages are blocked by Robots.txt file.

That means they will not be crawled by the search engine crawlers. Hence there is no benefit to link that label page. It will only waste our valuable link juice that we can use to increase our blog page rank.

Now here we can apply a trick. The trick is that we can create a HTML sitemap page for the particular label and use it every time when we need to interlink the label.
That sitemap page will hold all the posts which come under the same label. If page rank of that page will increase, all of the posts will get some strength and link juice will be divided among all of them.

In that way, the page rank juice will flow among the entire blog. In result the PR of our blog will increase.

Now let's see how we can increase page rank for that sitemap page.

Increase Page Rank for Sitemap Page

Once you create your HTML sitemap page, use it every time when you need to build links for the label page.
  1. Use it in internal links.

  2. Build quality backlinks for that page. You can read this tutorial that describes how to build quality backlinks for blog or you can read these Social bookmarking tips to build genuine dofollow backlinks.

  3. Use that page as a website URL in blog commenting. The best way to get dofollow backlinks from blog commenting is commenting on KeywordLuv and CommentLuv enabled blogs.

Tips and Tricks Backup / Restore Template in Blogger New Interface

backup restore blog template
Are you going to make changes in your blogger blog template or going to include some extra HTML, CSS or JavaScript code to add more functionality to your blog like post views counter or any other widget? If yes, then wait for a minute. By saying wait, I mean you should do something before making any changes. If you don't want any template crash during customization, you should definitely make a backup of your template in your PC. By storing a backup file, you can revert to original template if there is any mess up with your blog template during tinker with the code. It will also prevent you from losing all your hard work and precious time which you denote to design your blogger template. If by mistake you do something wrong with your template during make changes, then you will be able to go back in the previous stage easily. Now you are clear with the importance of keeping a backup file. So, let see how to backup and restore template in blogger new interface.

Note: Always make a habit of backup your blog template if you are planning to do editing in your blog template.

Backup Blogger Template

  1. Open your blogger dashboard.
  2. Point to your blog menu and select template.
    blog template

  3. Press Backup/Restore button located at the top right corner.
    backup restore button
  4. Click "Download full template" button.

    download template
  5. Done!
Now you have successfully store a template backup in your PC. Keep it in a safe place where you remembered it. So that, when required you restore it without any headache. Now, let see how to restore a template.

Restore Blogger Template?

Restoring a blogger template is also as easy as backing up. Let see how to do it.
  1. Repeat step #1 to #3 that you do while backing up your template.
  2. Click on Choose File button.
  3. Select your backup template from the location where you keep it.
    Tip: It will be an .XML file

    upload template

  4. Now simply press the Upload button and you have done.
You see how easy this to restore blog template in a single click. This is a part of my blogger tips series. You may be interested to read this post also.

Contact Us Form in Blogger Using Google Drive Tips and Tricks

Google drive contact us form
Contact us page is a need of every webmaster or a blogger. Having a contact form in your blog is must if you want to interact with your visitors. If your visitors read your posts and want to contact you, then they will be able to directly contact you via contact form. There are lot of free services available on the internet that you can use to create a contact form for your blogger blog but today, I will share some easy steps that will help you to create contact form by using Google Drive. You all know that the services Google provide are all awesome, then why we go to another service provider for our contact form if Google is providing us this facility itself. Now, without taking your too much time lets go to the tutorial on How to create a contact us form in Blogger using Google Drive or Google Docs.

Create Contact Form

  1. Go to Google Drive and log in with your Gmail id.

  2. Click on Create button from the left side and choose Form option.

  3. Create Contact Us Form in Blogger Using Google Drive Tips and Tricks

  4. A new tab will open. Enter your form name and choose default theme and then press OK.
  5. form name

  6. A default form will create. Now enter Name in the Question Title field, tick on required question and then press done button as shown in the screenshot below.

  7. form field
  8. To add more options like Email, Subject and Message simply press the add item button and add as many items you want to add in your contact form.
  9. Once you satisfied with the form, press the send form button from the top right corner of the screen.
  10. A dialog box will open. Click on Embed button and copy the entire code on notepad and hit done button.
    Tip: The code will look like this:
<iframe frameborder="0" height="500" marginheight="0" marginwidth="0" src="https://docs.google.com/forms/d/xxxxxxxxxxxxxxxxxxxxxxxxxxxxxxxxxx/viewform?embedded=true" width="760">Loading...</iframe>

The contact form is created. Now we have to enable notification option means when somebody fill and submit the form from our blog, then we should receive a notification. To do this follow the below steps:
  1. Click on choose response destination button from the top of the page.

  2. choose response destination

  3. A pop up box will appear. Select new spreadsheet radio button and press create button. See below screenshot.

  4. create spreadsheet
  5. Now click on View responses button from the top.


  6. A new tab will be open with a spreadsheet.
  7. Now click on Tools menu and choose notification rules.

  8. notification rules
  9. A popup menu will appear. Simply tick on A user submits a form and Email - right away options and press save button!

  10. email - right away
  11. Done!

  12. Now the next thing we have to do is create a contact us page in blogger blog.

Create Contact Us Page

  1. Go to blogger dashboard.
  2. Create a new blank page.
  3. Type Contact Us in the page title field.
  4. Choose HTML and paste the code of your contact form which you was copied in notepad.
  5. Click publish and you have done.
Now visit your blog and look at contact form on your contact us page.
This was the tutorial which I make to show you how to make contact us or contact me form for contact page in your blogger blog. You can use that code on any of your blog or website. Hope you like my tutorial.

Create Google Plus Page For Blogger Tips and Tricks

create google plus page
After my previous post on how to create a Facebook page, most of my friends and readers ask me that how they can create a page on Google plus too to promote their blogs and websites. So, I decided to write a post on step by step guide that will tell all the steps to create Google plus page for blog. Promoting the blog on Google+ is very important after the Google's panda and penguin algorithm updates. Now Google started giving more value to those blogs which have more Google plus one and Facebook likes. If you are not promoting your site on Google plus then start using it today. I will tell you how you can create a page for your blog on Google plus. Let see the steps.

Create Google Plus Page


  1. Go to your Google Plus account.

  2. Click on more link from the left side menu.

  3. google plus

  4. After you click the more link, you will see some more options. Choose Pages from them.

  5. pages

  6. Once you click the Pages option then look for Create New Page button at the top right corner.

  7. create new page

  8. Now choose your page category. If you want to create page for your blog or website then I recommend to choose Other category.

  9. choose category

  10. Now fill some basic information like your page name and blog URL and tick the page terms checkbox as shown in the below image.

  11. enter page name

  12. Click on continue button.
  13. Done!

Congratulation! You have successfully created fan page of your blog on Google plus.

How to Add Title and Alt Attribute To Optimize Images For SEO Tips and Tricks

Image optimization tips
In my previous post I was discussed some image optimization techniques that help to increase blog traffic. Today I bring another helpful tutorial for blogger.com users. In this tutorial I will tell you how to add title and alt attribute for images while using them into blog posts. I am not going to tell you the benefits of using these two tags because I have covered this topic in my previous post. If you want to know in detail then read this "6 Tips To Optimize Images For SEO To Increase Blog Traffic". You will surely find this tutorial very interesting because these are the must use SEO techniques if you want to increase your blog traffic. So let play the tutorial.

Image Optimization For SEO in Blogger

  1. Go to blogger dashboard.
  2. Write new post.
  3. Upload an image by clicking the image icon from the top menu bar as shown below.
  4. insert image

  5. Now to add title and alt (description) attribute to your image left click on the image and choose properties.

  6. image properties
  7. Once you click on the properties link, a pop up box will appear. Enter title and alt tag there as shown in below screenshot.

  8. image optimzation blogger

  9. Now click Ok and you are done!
Use this feature very wisely. This will surely help your blog to rank well in search engines. Don't use too many keywords in these tags. Only use one keyword that describes your blog post very well.

Schedule Blog Posts For Auto Posting in Blogger Tips and Tricks

schedule blogger posts
Blogger provides us some very handsome features but many of the users are unvaried from them. In my blogging career I was also not aware with a very powerful feature of blogger platform that is scheduling the posts. Today while reading some great blogs I got this trick that helps us in future posting. Scheduling the posts for future posting is very helpful tool that provide facility to the publishers to auto publish their posts at the scheduled time while they are not able to post it manually.  In this tutorial I will tell you how to schedule posts in blogger blog and why we need to schedule posts in blogger. Let's go to the tutorial.

Why We Need Scheduling?

We all know that it is very important to update our blog on regular basis to maintain our blog readership and to keep our readers happy with new posts that help to increase blog traffic. But how we update our blog if we are busy in our exams, need to go for vacation, any tour or to attend any marriage outside the city. At that time we can write multiple posts before going for any occasion and schedule them so that they got published automatically in our absence. Now you know the benefits of auto posts to blogger so let see how to do it.

Schedule Blog Posts

Follow below some easy steps to learn scheduling your blog posts.
  1. Go to blogger dashboard.

  2. Create new post.

  3. Once complete writing your posts, select Schedule from post editor on the right side.

  4. schedule posts

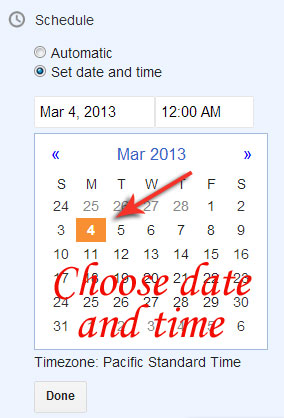
  5. Once you click on schedule posts tool, you will see two options there. Click on Set date and time option and select the time and date on which you want to schedule your posts for future auto posting.

  6. set date and time

  7. Press done button.

  8. Now click on publish button. Don't worry your post will not publish now. It will publish at the same date and time you have scheduled it.