Sunday, 9 June 2013

Continuing Blogger Blog From Being Indexed in Search Engines

Prevent Blog Indexing
When you start your new blog, it start being indexed and crawled by search engines bots after few days but if your blog is not fully ready for public readers then it will hurt your blog reputation because no one like to read under construction blogs. At the early state or development period of blogs we need to first prepare its design looks professional and blog should be content ready so that early visitors don't go frustrated with poor and incomplete content. We should prevent our blog from being indexed in search engines till it is not fully complete so that we can welcome the readers to visit our blog and read our content. In this tutorial you will learn how to prevent blogger blog from being indexed and crawled in all search engines.

Protect Blog from Indexing


This goal is very simple to achieve just follow the below steps:
  1. Log in to your blogger dashboard.

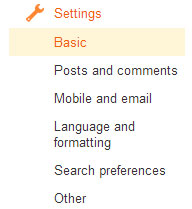
  2. Go to Settings >> Basic.

  3. blogger basic settings

  4. Now click on "edit" under the privacy section.

  5. Select "No" for both the options "Add your blog to our listings?" as well as "Let search engines find your blog?". See below picture.

  6. blogger privacy
  7. Now click on "Save changes" button.

  8. You are done!

If you want to make your blog private so that only blog admin and authors can access it not the public users then read this post: How to Make Blogger Blog Private?

Replace Blogger Home, Newer & Older Post Link With Image Tips and Tricks


Newer Older Posts Buttons

Blogger blogs by default comes with nasty page navigation  under all the posts in the sequence of "Newer Post", "Home" and "Older Post". If you are working to convert your blog into a professional website then you must think to change these ugly links with stylish images or buttons. It will not only enhance your blog design but also attract your readers to read more posts. Hence you can increase your blog page views by doing these simple changes. You are reading this tutorial so I can hope that you already see these types of fancy next and previous buttons on some big blogs. If those blog’s owners are using these types of buttons then you should also try them. Replace older and newer posts links with images to give your blog a professional touch. So, let's see how to do it.

Replace Newer and Older Posts Links with Image

Below are some simple steps that you have to follow.
  1. Go to your blogger dashboard.
  2. Navigate to Template > Edit HTML (first Backup Your Blog Template)
  3. Tick on Expand Widget Template box.
  4. Press Ctrl+F and search for

  5. <data:newerPageTitle/>
  6. and replace it with below code.
  7. <img src="https://blogger.googleusercontent.com/img/b/R29vZ2xl/AVvXsEio8vklyp1l6u3hPOm1j1TQ8scU0ckhB1dBX2R6dp3ufAtGBMoC_qQ7pLLhvfRnYTwkbDmtTgZAwRQUvjYNDVr8R1lRPkWOSpMxIA01wbXF6XjXy_460oB8fnTx3jEywRMIatLPPHgNGcqY/s400/previous.png"/>
  8. Now search for
  9. <data:olderPageTitle/>
  10. and change it with

  11. <img src="https://blogger.googleusercontent.com/img/b/R29vZ2xl/AVvXsEjdk75z7Ku4pevnZbtpGh_uEQ8x4FHI5lLEWI9xa8tATCy62GfO5FeOlWAIHMsx6mXfTI9izImRLXGuVN-isBoeTDu0lqDs_QVg4ix9bUkXXXT6ooVw4eh1oqRVYmlRSuF86sPR-NI3Ewp5/s400/Next.png"/>

  12. Now again search for
  13. <data:homeMsg/>
  14. and replace it with

  15. <img src="https://blogger.googleusercontent.com/img/b/R29vZ2xl/AVvXsEhFQEGl_Qfg9LR4OV8e-3dLw7DAPWPsCkOc3UuVSGq-mTkGzWod3A2usqjYwJLhUiTvqrNuOVIkF_b7lO3q4N4IxLMN_pa2d5-CBAWxkQqfd-VwGtd1_L9jJ0mPJqsmf9FOwczuDXRBZ1p8/s1600/home.png"/>

  16. Now click on save template button.
  17. You are done!
Customization: If you want to use another images according to your choice, then simply change the URL of the images with your own images.

Make Blogger Blog Private Tips and Tricks

Make Blogger Blog Private
Blogs created on blogger are by default open for all readers so that they can come and read any blog according to their choice. But sometime we need to make our blog private so that nobody can read it without our permission like in case of private blog where we share our family photos for family members only or a blog for friends so that only they can read that blog. The reason can be different for different bloggers to make their blogger blog private and restricted for specific readers.

Blogger provides a weird tool by which we can easily restrict our blog for public readers. They will not be able to access our site. Only blog admins and authors can access the blog if they are log in to their Google account. Let's start the tutorial.

Make Private Blog in Blogger

Log in to Blogger and go to Settings >> Basics >> Blog readers.

blogger basic settings

Under the blog readers section click on edit link where you will find below three options.

  1. Anybody: This option is selected by default means your blog is open for public readers. Anyone can access your blog.

  2. Only Blog Authors: If you choose this option then your blog will become restricted for public users. Only blog admin and blog authors can read the blog. But they have to log in to their Google Account to access the blog.

  3. Only These Readers: This is the last option which provides the facility to open your blog for particular readers. You can enter the list of their email ids so that they can receive an invitation to become your blog readers.
Choose any one from these three options and click on "Save changes" button.

Remove Blogger Navbar Tips and Tricks

Remove Blogger Navbar

Blogger platform is simple and easy to use. There are numberless third party templates available in the blog-o-sphere. You can use any template to give your blog a professional look. But if you are using blogger's default templates then you definitely notice that there is a navbar (navigation bar) at the top of your blog. This navbar looks nasty and it shows that this is not a website but simply a free blog. It will ruin your efforts to convert your blog into a professional blog. So, at that time you may think to remove navbar from your blogger blog. Don't worry I have the solution of your problem and it is very easy to remove the navbar. Let's start the tutorial.

Remove Navbar from Blogger Blog

There are two methods by which you can remove navbar from your blog. First by hiding it using CSS and second one is by disable it from blogger layout. Let see both the methods.

Hide Navbar Using CSS

  1. Go to Blogger >> Template >> Edit HTML

  2. Please Backup your blog template first. (Read this: How to backup template in blogger?)

  3. Search for
  4. ]]></b:skin>
  5. Now paste the below code just above it.
  6. #navbar-iframe { display: none !important;}
  7. Click save template button.

  8. You are done!

Disable Blogger Navbar

If you don't want to put additional CSS code in your blog template then you can also remove navigation bar by using below method.
  1. Go to Blogger >> Layout

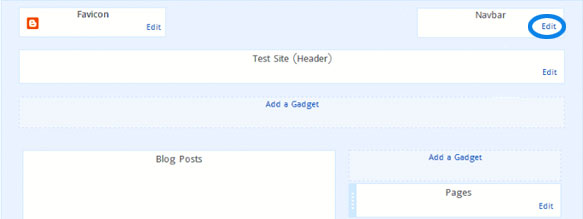
  2. Now click on edit under the navbar section. See below screenshot.

  3. remove blogger navbar

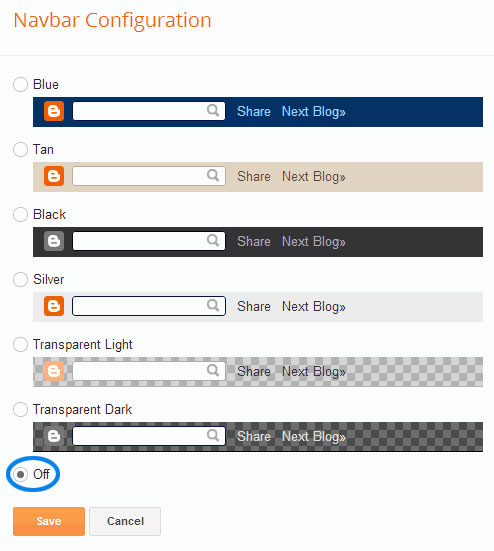
  4. A Navbar Configuration pop up will open. Choose "off" from the various options.

  5. disable blogger navbar
  6. Click on save button.

  7. You are done!

Super 4 Benefits of Internal Linking in SEO

internal Linking SEO
Every blog or website owner must think about the strategies to increase its usability and value for both to the readers and search engines as well. Providing regular unique and original content to the readers is must to rank well in search engines and to achieve your blogging goals. But increasing its value is the crucial thing. As we all know that Google's ranking algorithms are going hard to follow day by day. Search Engine Optimization has changed its meaning and usage in past years.

Today, we need to focus on maintaining usability of our blog to protect it from losing its value in the eyes of major search engines. We need to build best quality backlinks to stand out our blog from the crowd. There are lot of techniques to increase blog readership and value to gain trust of the readers and search engines as well. In today's post I'll discuss about one of the techniques that is internal linking and its benefits.

Advantages of Internal Linking

There are numerous benefits of internal linking in SEO and we will go through from them one by one. But before telling you the benefits of it let me tell you what does internal linking means?

Internal linking is the technique of Search Engine Optimization to link one post to another in such a manner that increase blog or website's usability to the readers and provide them more relevant content to read.

Now you have understand what does internal linking means, so let see it's advantages in SEO.

Increase Readership


Increase Blog Readership
Linking to internal posts is the best way to increase readership around the blog. If You write a post and provide top quality internal links with proper use of anchor texts then your readers feel easy to navigate your site from one post to another. You help them to reach that location of your blog where they want to go for more information they are looking for hence better readership of your blog.

Increase Page Rank


Increase Pagerank
Internal linking is the best method to increase link popularity. It passes link juice from one post to another in the form of links which seems like a vote to the linked post that helps it to gain Google pagerank and rank well in search engines. By this process page rank flow completely in your blog and all posts that help them in gaining strength to stand out and bring more traffic from search engines. It also increases number of backlinks to all posts that help them to increase their rank.

Better Crawling and Indexing


Web Crawling
You may heard that search engine crawlers are known as spiders. This is the main reason to call them as spiders because they like content interlinked with more relevant content. As linking to related posts helps readers to find the information more quickly and easily, it also help web crawlers to crawl and index all of your content by providing a convenient path to follow.

Decrease Bounce Rate


Decrease Bounce Rate
Last but not the least benefit of internal linking is it decrease your blog bounce rate without doing any extra hard work. You just provide links to more relevant posts and readers click those links to read more content. It automatically increase blog page views and reduce bounce rate that is must for every blog to build trust in the eyes of search engines. less bounce rate shows the authority and usability of a blog.

Automatic Share Blog Posts on Facebook, Twitter and Google Plus Super Tips and Tricks

Share Blog Posts
Previously I shared a trick to auto publish blog posts on twitter to prevent valuable time wastage. As you may all know that all social media sites are very important to share the content if we want to increase blog traffic and social presence. That's why today I bring another trick that will help us to share our blog posts after publishing directly on all social media sites like facebook, twitter and Google Plus using a amazing service dlvr.it that delivered the content across the social media sites. So, let see how to use it to setup auto blog posting on facebook, twitter and Google Plus.

Sharing Blog Posts on Facebook, Twitter and Google Plus

Below are some very simple steps which you have to perform.
  1. Go to dlvr.it and sign up for an account.

  2. dlvr sign up

  3. Now add your feedburner feed URL in the given box as shown in below images. If you don't have feedburner feed URL then read this post to setup feedburner feed for blog.

  4. add your feed

  5. Now choose your destination where you want to share your feed. For example: I choose twitter.

  6. choose your destination

  7. Once you click on twitter icon you will redirect to twitter page. Enter your twitter username and password and click on "Authorize App" button.

  8. authorize app

  9. Once the process is complete your twitter account will be added in your dlvr.it dashboard. It means now your blog feed is ready for automatic share on twitter. If you want to add more social media sites like facebook or Google plus then simply click on "Add Route" button as shown in below image.

  10. add route
  11. Once you click on Add Route button, you have to add the source and destination. Choose your existing feed URL as source and select social media site of your choice as your destination.

  12. choose source and destination

  13. Once you setup all these things you will be ready to share your blog feeds on facebook, twitter, Google plus etc.

Auto Tweet Blog Posts on Twitter Tips and Tricks

tweet feeds
 
You have created a twitter account to tweet your blog posts to increase blog traffic, but you may feel that tweet your posts manually is really a boring and time consuming process. At this stage you definitely need a service that can do this work for you. In today's tutorial, I going to show you that how you can auto tweet your blogger blog posts on Twitter via Feedburner. Once you apply this trick into your feedburner account you will get to know that how amazing is this free service. It will automatically tweet your latest posts into your twitter account on behalf of you. So, let's begin the tutorial.

Auto Tweet Blog Posts

  1. Login to your feedburner account.

  2. Now choose your blog for which you want to auto tweet on twitter.

  3. Click on Publicize Tab > Socialize > Add a Twitter account. See below screenshot.

  4. feedburner socialize

  5. Now enter your username and password to twitter page and click on Authorize app button.

  6. authorize app

  7. You are Done!